Henna paste that gives the deepest, longest lasting color, takes me 48 hours to prepare. It is possible to get a good paste in 24 hours, but the best paste, in my humble opinion, is given time and temperature for the henna leaves to release their dye.
On Wednesday morning I began the process by melting two "cubes" of prepared henna tea (I learned to mix a tea over 10 years ago, and have been adjusting it ever since,) adding some lemon juice, and after letting that cool, I added three henna powders to the liquid.
It is important for me to select a good texture for the paste on the first day. I find it better to make a bit thicker paste on the first day, that way I can adjust it with essential oils and other liquids to make it the consistency that I prefer to work with on day two.
After mixing the tea, lemon, powder and a touch of cajeput oil on day one, I put this in a stainless steel bowl, cover it with plastic wrap, but that wrap in a plastic bag, and put that on the porch to cure in the sun.
The warm summer sun on the porch helps the henna to release the dye. On the morning of the second day, I check to see if the dye has been released. This can be determined by just looking at the paste in the bowl. The past will be darker and you may see a reddish liquid at the bottom of the bowl.
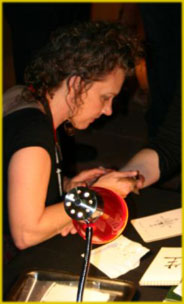
On the second day I add a combination of essential oils ( called "terping") to help the paste continue to release the darkest dye, as well, to make the paste into a workable texture. I have learned over the years that a more liquid paste is easier to apply, stays wet on the skin longer, and gives a darker color.
I now use about 8 oils in the blend, although not all the oils each time. Sometimes I mix the batch with fewer. Oils that I have use are:
On Wednesday morning I began the process by melting two "cubes" of prepared henna tea (I learned to mix a tea over 10 years ago, and have been adjusting it ever since,) adding some lemon juice, and after letting that cool, I added three henna powders to the liquid.
It is important for me to select a good texture for the paste on the first day. I find it better to make a bit thicker paste on the first day, that way I can adjust it with essential oils and other liquids to make it the consistency that I prefer to work with on day two.
After mixing the tea, lemon, powder and a touch of cajeput oil on day one, I put this in a stainless steel bowl, cover it with plastic wrap, but that wrap in a plastic bag, and put that on the porch to cure in the sun.
The warm summer sun on the porch helps the henna to release the dye. On the morning of the second day, I check to see if the dye has been released. This can be determined by just looking at the paste in the bowl. The past will be darker and you may see a reddish liquid at the bottom of the bowl.
On the second day I add a combination of essential oils ( called "terping") to help the paste continue to release the darkest dye, as well, to make the paste into a workable texture. I have learned over the years that a more liquid paste is easier to apply, stays wet on the skin longer, and gives a darker color.
I now use about 8 oils in the blend, although not all the oils each time. Sometimes I mix the batch with fewer. Oils that I have use are:
- clove
- cajeput
- basil
- neroli
- naioli
- cardamom
- tea tree
- geranium
- lavender
You can visit other sites to see lists of other oils. I am satisfied with the nice reds I am able to get on the back of the hand using this method.
If you have a look at the video below, you will see a nice, fluid paste that goes on well. I like to use this viscosity myself. I hope you find this post helpful.
You may see colors of the results of this recipe on my FaceBook page.