I wish I had remembered to take more photos of this bridal henna tattoo. We were actually able to finished the fingertips with bold tear drops, dots & flourished that met the pattern you see here in the photo.
The finish for the backs of the hands featured compatible floral & paisley accents that were embellished with the little glove spots.. giving the look of wearing an old fashioned glove. As this was henna in the winter time, I used plenty of lemon sugar glaze to help the henna stay wet as long as possible & blow drying from time tot time to help open the pores.
It was important that we finish the henna as quickly as possible, so I will hope to receive photos of the finished color sometime next week. Stay tuned!
Wednesday, December 31, 2008
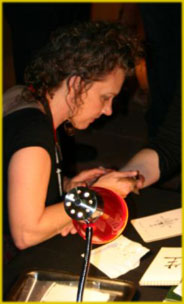
Bridal Henna - palms in process
Friday, December 19, 2008
Wednesday, December 17, 2008
Finished Color - More or Less
 I forgot to ask my friend to take a photo for me today. It was a beautiful, sunny day... I even had my camera.. but no.
So.. here is a photo taken at 9PM.. by me.. camera phone.. bad lighting.. sorry ;{ for poor quality.
However, I said I would post a photo of the finished color. I left the paste on for about two hours, then just did the olive oil after care.. and voila!
Tuesday, December 16, 2008
Practicing Peacock Arm Tattoo
 Inspired by the henna video showing work by the artists of Nepal, I decided to practice to improve both speed & style.
Here is a photo of late night henna practice where the work focused on creating an armlet tattoo. I feel very good about peacock faces in general.. and I am sure the eyes are improving.
I also feel better about my use of negative space, and am remembering to double line major design areas so that they really stand out.
Also, bolding or filling some areas also sees to help bring a design to life.
Of course the greatest difficulty I find when henna-ing myself is working upside down!
And then there is not smudging as I go! This is when the use of lemon sugar glaze & a blow dryer is priceless.
I can work out the pattern, spray, dry, and continue without having to be overly careful.
I will be able to put up finished color photos of this tattoo.. so ..
Stay tuned?
Namaste
Sunday, December 14, 2008
Winter Henna - How to Wrap for Good Color


 I am so fortunate to have met a new & wonderful goddess with a love of body art! Here are photos of her henna journey in December.. Jacksonville, Florida.
The first photo in this series is of the palms of the hands. To accomplish this tattoo, I started with the Lotus Om on the left hand, then the mandala center on the right.. back to the left and so on.
The patterns were misted with a lemon sugar glaze and allowed to dry as we moved from hand to hand, finishing the palms... but stopping before we got to the tips of the fingers. This way, it is easy to turn the hand over, resting on the finger tips, to apply mehandi to the back of the hands.
It is very important to remind that henna is a heat activated body dye. What that means is that warm temperatures help open pores, keep palms warm & moist, thus allowing the henna to stay active on the body for a longer period of time. All these conditions make for a dark finished color & a longer lasting tattoo.
The second picture in this series shows the "henna wrapping" which is a photo of tissue (which is taped when necessary to keep the tissue in place) and the plastic gloves used to create a little henna spa.. or sauna.. to give dark color in the winter time.
The tissue actually sticks to the lemon sugar glaze that is regularly applied during the henna process, and the tape helps keep the tissue in place. The little gloves (food service grade) are also taped shut at the wrist for comfort. There are so many benefits to this method, which I always use for bridal henna to ensure the darkest color, winter or summer in this air-conditioned part of the country!
Photo three is Tara's peacock garden pattern. You may be able to see the head of the peacock page right, then notice the tail that spreads across her fingers. The little six petaled flowers that grace the back of her hand are traditional, as are the little dots.
Once the back of her hands was finished, we turned palms face up to spread henna paste to cover the tips of her fingers. Photo four show the joy of a good design... that the back of the hand is visually pleasing when presented with the palm. As always, I hope to be able to post finished color photos in the near future.
Although this pattern was completed on Saturday afternoon, the finished color will not reveal itself until Monday. Henna usually takes about 48 hours to develop. For more tips on how to have a successful henna tattoo, please visit my site, or browse other posts in this blog.
As you can see from the photos, Tara got her manicure before her henna... which will make her design last longer & provides us all with these lovely photos. Henna tattoo is available by appointment during the winter months for those who chose traditional patterns, palms and backs of hands.
Summer time is our henna party season.. for that little something, just for fun. Namaste!
Tuesday, December 02, 2008
Fine Art Photo? Can you find the henna tattoo?
 I am so happy to have been able to do this full hand henna pattern.
An "original" free hand design, the use of negative space makes a lovely pattern.
Can you find the henna in this photo?
I really like the mehandi against this fabric. I am sure there is another foto coming soon.. but as I have yet to see it, I share this image with you in hopes that you will find is as much fun as I do.
Wishing you warm nights.
Namaste,
Ann George
Subscribe to:
Posts (Atom)